Bicycle with alternator connected

Alternator and Stand rotate up and are fixed to saddle for ease of transport and storage
Donor Bike
I removed the mudguards, rear rack and rear tyre/tube. The front wheel and tyre remain so the bike can be moved about if required. If you do not have a front wheel just bolt a stand to the front forks.
The brakes were left on to give alternative hand position on the handlebars. The back brake has a quick release lever which is used in reverse so the rear wheel can be locked to prevent the bike being pedalled without the battery connected.

The charger can also be used as an exercise bike so a speedo and heart rate monitor are also fitted. This has been modified to run off the back wheel.
.gif)


Click to enlarge

In my setup I have a small solar panel that keeps the battery topped up when not in use. I also have a mains powered charger as well as the bicycle powered charger. These are all controlled by the main control panel mounted next to my boiler.
The control panel also has a voltmeter and ammeter installed so I can check the state of charge of my battery and also monitor the charge from my solar panel and mains charger.
Bike Dashboard Layout

Suppressed Zero Voltmeter
Original Voltmeter scale


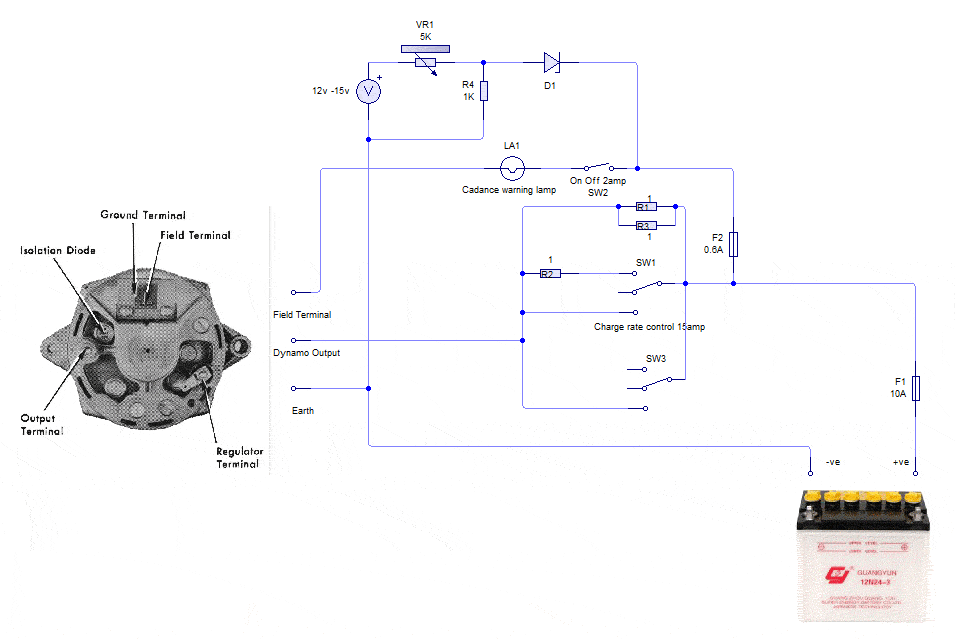
I used a suppressed zero voltmeter. Components D1 (12v zener diode) , R1 and VR1 ensure the voltmeter only starts reading from 12volts. The spec label on my Voltmeter had faded so I used trial and error to find the correct components.
R4 can probably be left as per my diagram and just ensures a stable voltage is obtained.
Completed Suppressed Zero Voltmeter Scale

The original scale on my voltmeter was from 0 to 30volts. I made a new scale by removing the old scale from the meter and scanning it into a paint package on my PC. I deleted the old numbers but left the scale in tact.
I then just added my new numbers on the volts scale and rotated them to match. This was then printed on photo quality paper cut out and spray mounted to the old scale.
You could also use a Cad program to draw the scale from scratch and print onto lazertran transfer paper and transfer onto the original scale spray painted white.
Front and back vero board layouts for suppressed zero Voltmeter
Board mounted to back of voltmeter


Basic bike components required.

Alternative arrangement which may be useful is your donor bike has damaged to the front end and forks.

Frame chopped at down tube and mounted inverted on bike stand. Chair mounted to raised metal frame and connected to the bike downtube. The length of this connection can be varied to suit riders leg length.